1
2
3
4
5
6
7
8
9
10
11
12
13
14
15
16
17
18
19
20
21
22
23
24
25
26
27
28
29
30
31
32
33
34
35
36
37
38
39
40
41
42
43
44
45
46
47
48
49
50
51
52
53
54
55
56
57
58
59
60
61
62
63
64
65
66
67
68
69
70
71
72
73
74
75
76
77
78
79
80
81
82
83
84
85
86
87
88
89
90
91
92
93
94
95
96
97
98
99
100
101
102
103
104
105
106
107
108
109
110
111
112
113
114
115
116
117
118
119
120
121
122
123
124
125
126
127
128
129
130
131
132
133
134
135
136
137
138
139
140
141
142
143
144
145
146
147
148
149
150
151
152
153
154
155
156
157
158
159
160
|
void myDisplay(void){
glClear(GL_COLOR_BUFFER_BIT);
glColor3f (0.0f, 0.0f, 0.0f);
pnarcArc(10,0,0,1);
pnarcArc(10,0,0,2);
pnarcArc(10,0,0,3);
pnarcArc(10,0,0,4);
dda(-30,-15,30,-15);
dda(-30,-15,0,28);
dda(0,28,30,-15);
midPointLine(-60,60,60,60);
midPointLine(-60,-60,60,-60);
midPointLine(-74,46,-74,-46);
midPointLine(74,46,74,-46);
pnarcArc(14,60,46,1);
pnarcArc(14,-60,46,2);
pnarcArc(14,-60,-46,3);
pnarcArc(14,60,-46,4);
bresen(-25,76,-25,60);
bresen(26,76,25,60);
midPointLine(-54,150,54,150);
midPointLine(-54,76,54,76);
midPointLine(-64,140,-64,86);
midPointLine(64,140,64,86);
pnarcArc(10,54,140,1);
pnarcArc(10,-54,140,2);
pnarcArc(10,-54,86,3);
pnarcArc(10,54,86,4);
pnarcArc(10,-30,111,1);
pnarcArc(10,-30,111,2);
pnarcArc(10,-30,111,3);
pnarcArc(10,-30,111,4);
pnarcArc(10,30,111,1);
pnarcArc(10,30,111,2);
pnarcArc(10,30,111,3);
pnarcArc(10,30,111,4);
bresenhamArc(20,0,111,4);
bresenhamArc(20,0,111,5);
dda(-35,150,-35,173);
dda(35,150,35,173);
bresen(88,98,88,131);
bresen(67,98,67,131);
bresen(70,95,85,95);
bresen(70,134,85,134);
pnarcArc(3,85,131,1);
pnarcArc(3,70,131,2);
pnarcArc(3,70,98,3);
pnarcArc(3,85,98,4);
bresen(-88,98,-88,131);
bresen(-67,98,-67,131);
bresen(-70,95,-85,95);
bresen(-70,134,-85,134);
pnarcArc(3,-70,131,1);
pnarcArc(3,-85,131,2);
pnarcArc(3,-85,98,3);
pnarcArc(3,-70,98,4);
bresen(-73,25,-80,25);
bresen(-73,43,-80,43);
bresen(73,25,80,25);
bresen(73,43,80,43);
dda(-108,45,-108,0);
dda(-81,45,-81,0);
dda(-108,45,-81,45);
dda(-108,0,-81,0);
dda(108,45,108,0);
dda(81,45,81,0);
dda(108,45,81,45);
dda(108,0,81,0);
bresen(-101,0,-101,-4);
bresen(-88,0,-88,-4);
bresen(101,0,101,-4);
bresen(88,0,88,-4);
dda(-108,-4,-108,-37);
dda(-81,-4,-81,-37);
dda(-108,-4,-81,-4);
dda(-108,-37,-81,-37);
dda(108,-4,108,-37);
dda(81,-4,81,-37);
dda(108,-4,81,-4);
dda(108,-37,81,-37);
pnarcArc(10,-95,-47,1);
pnarcArc(10,-95,-47,2);
pnarcArc(10,-95,-47,3);
pnarcArc(10,-95,-47,4);
pnarcArc(10,95,-47,1);
pnarcArc(10,95,-47,2);
pnarcArc(10,95,-47,3);
pnarcArc(10,95,-47,4);
dda(-43,-62,-43,-69);
dda(-25,-62,-25,-69);
dda(43,-62,43,-69);
dda(25,-62,25,-69);
bresen(-47,-69,-21,-69);
bresen(-47,-117,-21,-117);
bresen(-51,-70,-51,-113);
bresen(-17,-70,-17,-113);
pnarcArc(4,-21,-73,1);
pnarcArc(4,-47,-73,2);
pnarcArc(4,-47,-113,3);
pnarcArc(4,-21,-113,4);
bresen(47,-69,21,-69);
bresen(47,-117,21,-117);
bresen(51,-70,51,-113);
bresen(17,-70,17,-113);
pnarcArc(4,47,-73,1);
pnarcArc(4,21,-73,2);
pnarcArc(4,21,-113,3);
pnarcArc(4,47,-113,4);
dda(-43,-118,-43,-125);
dda(-25,-118,-25,-125);
dda(43,-118,43,-125);
dda(25,-118,25,-125);
bresen(-59,-125,-8,-125);
bresen(-59,-137,-8,-137);
bresen(-59,-125,-59,-137);
bresen(-8,-125,-8,-137);
bresen(59,-125,8,-125);
bresen(59,-137,8,-137);
bresen(59,-125,59,-137);
bresen(8,-125,8,-137);
glFlush();
}
|


 如果我们不加 header,那么则会显示字符乱码,所以一定要记得下面这句话。


 点击环境变量进行环境变量配置,如图所示:
  配置方法一: 1)配置时找到系统变量,找到path变量,如果没有则新建。 在变量名填Path,变量值填 D:\jdk1.7\bin;注意要加分号! 如图所示:
  2)同理,找到变量名classpath,没有就新建一个classpath 变量值填D:\jdk1.7\lib;. 配制方法二:
 首先进行汉化
  在原先的JspEclipse下的eclipse文件夹下新建一个links文件夹,再新建文本文件,扩展名为link,内容如图所示:
  这样汉化就完成了
 同上在原先的JspEclipse下的eclipse文件夹下新建一个links文件夹,再新建文本文件,扩展名为link,内容如图所示:
  这样lomboz就配置完成啦,启动一下试试!
  此处显示中文,说明汉化成功! 小问题的解决:或许有的人会显示这样的页面:
  那么下载
那么下载  -vm 这里是相对的jdk环境设置,这个要设置成你自己的jdk环境,自己写一个路径,在bin目录下,一个javaw.exe文件,如果还不行,那么可能是jdk的版本导致的,我换用了jdk1.6测试成功!如果1.7不能用的话,就换用1.6版本的jdk吧! 好,小问题暂告一段落,看下图。
  如果你能新建Dynamic Web Project说明你已经全配置成功啦!欢呼吧骚年们!
 tomcat环境变量的配置: 1,新建变量名:CATALINA_BASE,变量值:D:\tomcat 6.0\apache-tomcat-6.0.29 2,新建变量名:CATALINA_HOME,变量值:D:\tomcat 6.0\apache-tomcat-6.0.29 【1和2中的路径根据你存放的目录不同而不同】 3,打开PATH,添加变量值:%CATALINA_HOME%\lib;%CATALINA_HOME%\bin 启动tomcat: 在开始菜单输入cmd,然后cd命令定位到tomcat的bin目录,如图
  然后输入 startup.bat命令,这时tomcat就启动起来了,会弹出一个新的窗口,那个就是tomcat
  下面这个图就是tomcat:
  下面进行测试:在浏览器输入
 点选服务器—>运行时环境—>添加,选择Apach—>tomcat6.0,完成
  创建之后编辑,添加tomcat的目录,名称自己随便取,jre用缺省jre
  这样在eclipse下方就出现了一个tomcat了,绿色的箭头就是启动,红色的方块是停止
  可以点击运行tomcat,其中点下方标记的红色处,可以对tomcat进行详细配置,默认配置即可,不用更改了
 点下一步,我取名为test,服务器选刚才创建的tomcat6.0,然后下一步,下一步,直到完成就好了
  在webcontent目录下面新建一个jsp文件,我的叫a.jsp
  我在body区输入了My First Jsp 右击该文件,在服务器上运行,选择tomcat,然后结果如图所示。恭喜你,所有配置都成功啦!
  点选eclipse的窗口,然后web浏览器,选default system web browser,即系统默认浏览器,就可以用自己的浏览器打开界面啦。如图所示











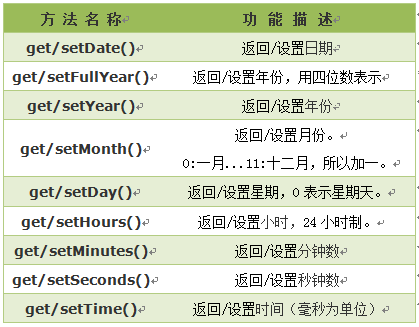


 注意: 1. 返回的内容是从 start开始(包含start位置的字符)到 stop-1 处的所有字符,其长度为 stop 减start。 2. 如果参数 start 与 stop 相等,那么该方法返回的就是一个空串(即长度为 0 的字符串)。 3. 如果 start 比 stop 大,那么该方法在提取子串之前会先交换这两个参数。 使用 substring() 从字符串中提取字符串,代码如下:
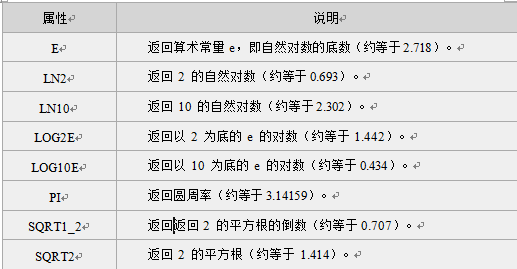
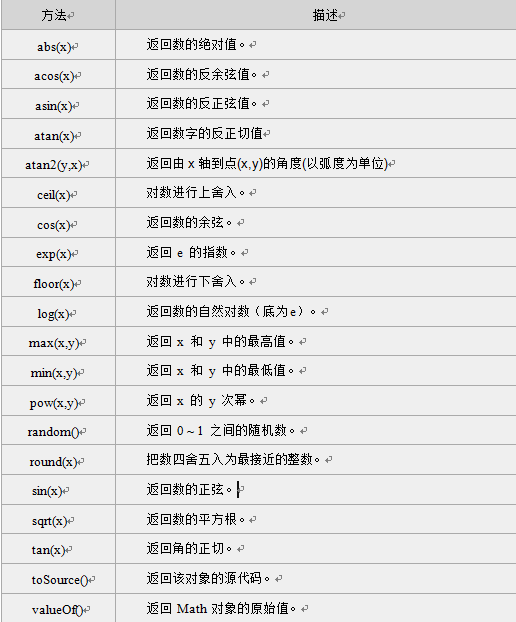

 注意:返回的是小于或等于x,并且与x最接近的整数。 我们将在不同的数字上使用 floor() 方法,代码如下:
 注意: 1. 返回与 x 最接近的整数。 2. 对于 0.5,该方法将进行上舍入。(5.5 将舍入为 6) 3. 如果 x 与两侧整数同等接近,则结果接近 +∞方向的数字值 。(如 -5.5 将舍入为 -5; -5.52 将舍入为 -6),如下图:
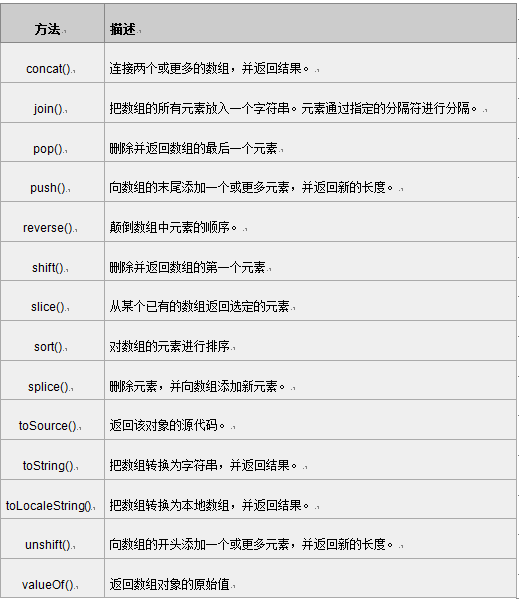

 注意:返回一个字符串,该字符串把数组中的各个元素串起来,用<分隔符>置于元素与元素之间。这个方法不影响数组原本的内容。 我们使用join()方法,将数组的所有元素放入一个字符串中,代码如下:

