def_requests_to_follow(self, response): """重写的函数哈!这个函数是Rule的一个方法 :param response: 这货是啥看名字都知道了吧(这货也是个字典,然后你懂的d(・∀・*)♪゚) :return: 追踪的Request """ # *************请注意我就是被注释注释掉的类型检查o(TωT)o # if not isinstance(response, HtmlResponse): # return # ************************************************ seen = set() # 将Response的URL更改为我们传递下来的URL # 需要注意哈! 不能直接直接改!只能通过Response.replace这个魔术方法来改!并且!!! # 敲黑板!!!!划重点!!!!!注意了!!! 这货只能赋给一个新的对象(你说变量也行,怎么说都行!(*゚∀゚)=3) # newresponse = response.replace(url=response.meta.get('real_url')) for n, rule in enumerate(self._rules): # 我要长一点不然有人看不见------------------------------------newresponse 看见没!别忘了改!!! links = [lnk for lnk in rule.link_extractor.extract_links(response) if lnk notin seen] if links and rule.process_links: links = rule.process_links(links) for link in links: seen.add(link) r = self._build_request(n, link) yield rule.process_request(r)
#!/usr/bin/env python # -*- coding: utf-8 -*- # Created by shimeng on 17-6-5 import os import re import json import requests import html2text from parse_content import parse
""" just for study and fun Talk is cheap show me your code """
text = html2text.html2text(content.decode('utf-8')).encode("utf-8") # 标题 r = re.findall(r'**(.*?)**', text, re.S) for i in r: if i != " ": text = text.replace(i, i.strip())
r = re.findall(r'_(.*)_', text) for i in r: if i != " ": text = text.replace(i, i.strip()) text = text.replace('_ _', '')
# 图片 r = re.findall(r'![]\((?:.*?)\)', text) for i in r: text = text.replace(i, i + "\n\n")
def get_ip(self, ifname=ADSL_IFNAME): (status, output) = subprocess.getstatusoutput('ifconfig') if status == 0: pattern = re.compile(ifname + '.*?inet.*?(\d+\.\d+\.\d+\.\d+).*?netmask', re.S) result = re.search(pattern, output) if result: ip = result.group(1) return ip
其实做爬虫,最基础的当然是写代码的能力,抓包什么的都不是什么困难的事,抓包很简单很简单。我觉得最难的是找到入口,找到一个最适合的入口。怎么定义这个最适合呢?就是要去尝试,依照一般的顺序,先找找 M 站,再找找 wap 站,最后再去看 PC 站,找到一个合适的入口,往往会事半功倍。前几天抓取途牛网的相关游记信息,爬 PC 站分分钟的 302,但是爬 M 站,全是接口,全程无阻。
def get_containerid(self,response): content = json.loads(response.body) # here, we can get containerid containerid = None for data in content.get('tabsInfo').get('tabs'): if data.get('tab_type') == 'weibo': containerid = data.get('containerid') print'weibo request url containerid is %s' % containerid
# construct the wei bo request url if containerid: weibo_url = response.url + '&containerid=%s'%containerid yield scrapy.Request(url=weibo_url, callback=self.get_weibo_id) else: print'sorry, do not get containerid'
def get_weibo_id(self, response): content = json.loads(response.body) # get weibo id ,you can also save some other data if you need for data in content.get('cards'): if data.get('card_type') == 9: single_weibo_id = data.get('mblog').get('id') print single_weibo_id # here ,if you want toget comment info ,you can construct the comment url just the same as wei bo url
from scrapy.cmdline import execute execute(['scrapy', 'crawl', 'mzitu'])
其中的 mzitu 就为待会儿 spider.py 文件中的 name 属性。这点请务必记住哦!不然是跑不起来的。 在 mzitu_scrapy\spider 目录中创建 spider.py。文件作为爬虫文件。 好了!现在我们来想想,怎么来抓 mzitu.com 了。 首先我们的目标是当然是全站的妹子图片!!! 但是问题来了,站长把之前那个 mzitu.com\all 这个 URL 地址给取消了,我们没办法弄到全部的套图地址了! 我们可以去仔细观察一下站点所有套图的地址都是:http://www.mzitu.com/几位数字结尾的。 这种格式地址。 有木有小伙伴儿想到了啥? CrawlSpider !!!就是这玩儿!! 有了它我们就能追踪“http://www.mzitu.com/几位数字结尾的”这种格式的URL了。 Go Go Go Go!开始搞事。 首先在 item.py 中新建我们需要的字段。我们需要啥?我们需要套图的名字和图片地址!! 那我们新建三个字段:
1 2 3 4 5 6 7 8 9 10
import scrapy class MzituScrapyItem(scrapy.Item): # define the fields for your item here like: # name = scrapy.Field() name = scrapy.Field() image_urls = scrapy.Field() url = scrapy.Field() pass
第一步完成啦!开始写 spider.py 啦! 首先导入我们需要的包:
1 2 3 4
from scrapy import Request from scrapy.spider import CrawlSpider, Rule from scrapy.linkextractors import LinkExtractor from mzitu_scrapy.items import MzituScrapyItem
from scrapy import Request from scrapy.spider import CrawlSpider, Rule from scrapy.linkextractors import LinkExtractor from mzitu_scrapy.items import MzituScrapyItem
from scrapy import Request from scrapy.spider import CrawlSpider, Rule from scrapy.linkextractors import LinkExtractor from mzitu_scrapy.items import MzituScrapyItem
from scrapy import Request from scrapy.spider import CrawlSpider, Rule from scrapy.linkextractors import LinkExtractor from mzitu_scrapy.items import MzituScrapyItem
# Define your item pipelines here # # Don't forget to add your pipeline to the ITEM_PIPELINES setting # See: http://doc.scrapy.org/en/latest/topics/item-pipeline.html from scrapy import Request from scrapy.pipelines.images import ImagesPipeline from scrapy.exceptions import DropItem import re
defitem_completed(self, results, item, info): image_paths = [x['path'] for ok, x in results if ok] ifnot image_paths: raise DropItem("Item contains no images") return item
DEFAULT_REQUEST_HEADERS = { 'User-Agent': 'Mozilla/5.0 (Macintosh; Intel Mac OS X 10_12_3) AppleWebKit/537.36 (KHTML, like Gecko) Chrome/56.0.2924.87 Safari/537.36' }
if'data'in results.keys(): for result in results.get('data'): yield Request(self.user_url.format(user=result.get('url_token'), include=self.user_query), self.parse_user)
if'data'in results.keys(): for result in results.get('data'): yield Request(self.user_url.format(user=result.get('url_token'), include=self.user_query), self.parse_user)
if'data'in results.keys(): for result in results.get('data'): yield Request(self.user_url.format(user=result.get('url_token'), include=self.user_query), self.parse_user)
if'data'in results.keys(): for result in results.get('data'): yield Request(self.user_url.format(user=result.get('url_token'), include=self.user_query), self.parse_user)
# Define here the models for your spider middleware # # See documentation in: # http://doc.scrapy.org/en/latest/topics/spider-middleware.html
from scrapy import signals import json import redis import random from .useragent import agents from .cookies import init_cookie, remove_cookie, update_cookie from scrapy.downloadermiddlewares.useragent import UserAgentMiddleware from scrapy.downloadermiddlewares.retry import RetryMiddleware import logging
from scrapy.spiders importCrawlSpider, Rule, Request ##CrawlSpider与Rule配合使用可以骑到历遍全站的作用、Request干啥的我就不解释了 from scrapy.linkextractors importLinkExtractor ##配合Rule进行URL规则匹配 from haoduofuli.items importHaoduofuliItem ##不解释 from scrapy importFormRequest ##Scrapy中用作登录使用的一个包
account = '你的帐号' password = '你的密码'
classmyspider(CrawlSpider):
name = 'haoduofuli' allowed_domains = ['haoduofuli.wang'] start_urls = ['http://www.haoduofuli.wang/wp-login.php']
''' 获取 ifconfig 命令的输出 ''' defgetIfconfig(): p = Popen(['ifconfig'], stdout = PIPE) data = p.stdout.read() return data
''' 获取 dmidecode 命令的输出 ''' defgetDmi(): p = Popen(['dmidecode'], stdout = PIPE) data = p.stdout.read() return data
''' 根据空行分段落 返回段落列表''' defparseData(data): parsed_data = [] new_line = '' data = [i for i in data.split('\n') if i] for line in data: if line[0].strip(): parsed_data.append(new_line) new_line = line + '\n' else: new_line += line + '\n' parsed_data.append(new_line) return [i for i in parsed_data if i]
''' 根据输入的段落数据分析出ifconfig的每个网卡ip信息 ''' defparseIfconfig(parsed_data): dic = {} parsed_data = [i for i in parsed_data ifnot i.startswith('lo')] for lines in parsed_data: line_list = lines.split('\n') devname = line_list[0].split()[0] macaddr = line_list[0].split()[-1] ipaddr = line_list[1].split()[1].split(':')[1] break dic['ip'] = ipaddr return dic
''' 根据输入的dmi段落数据 分析出指定参数 ''' defparseDmi(parsed_data): dic = {} parsed_data = [i for i in parsed_data if i.startswith('System Information')] parsed_data = [i for i in parsed_data[0].split('\n')[1:] if i] dmi_dic = dict([i.strip().split(':') for i in parsed_data]) dic['vender'] = dmi_dic['Manufacturer'].strip() dic['product'] = dmi_dic['Product Name'].strip() dic['sn'] = dmi_dic['Serial Number'].strip() return dic
''' 获取Linux系统主机名称 ''' defgetHostname(): with open('/etc/sysconfig/network') as fd: for line in fd: if line.startswith('HOSTNAME'): hostname = line.split('=')[1].strip() break return {'hostname':hostname}
''' 获取Linux系统的版本信息 ''' defgetOsVersion(): with open('/etc/issue') as fd: for line in fd: osver = line.strip() break return {'osver':osver}
''' 获取CPU的型号和CPU的核心数 ''' defgetCpu(): num = 0 with open('/proc/cpuinfo') as fd: for line in fd: if line.startswith('processor'): num += 1 if line.startswith('model name'): cpu_model = line.split(':')[1].strip().split() cpu_model = cpu_model[0] + ' ' + cpu_model[2] + ' ' + cpu_model[-1] return {'cpu_num':num, 'cpu_model':cpu_model}
''' 获取Linux系统的总物理内存 ''' defgetMemory(): with open('/proc/meminfo') as fd: for line in fd: if line.startswith('MemTotal'): mem = int(line.split()[1].strip()) break mem = '%.f' % (mem / 1024.0) + ' MB' return {'Memory':mem}
import re import scrapy #导入scrapy包 from bs4 import BeautifulSoup from scrapy.http import Request ##一个单独的request的模块,需要跟进URL的时候,需要用它 from dingdian.items import DingdianItem ##这是我定义的需要保存的字段,(导入dingdian项目中,items文件中的DingdianItem类)
$ composer require monolog/monolog Using version ^1.19 for monolog/monolog ./composer.json has been updated Loading composer repositories withpackage information Updating dependencies (including require-dev) - Installing psr/log (1.0.0) Downloading: 100%
ADSL (Asymmetric Digital Subscriber Line ,非对称数字用户环路)是一种新的数据传输方式。它因为上行和下行带宽不对称,因此称为非对称数字用户线环路。它采用频分复用技术把普通的电话线分成了电话、上行和下行三个相对独立的信道,从而避免了相互之间的干扰。 他有个独有的特点,每拨一次号,就获取一个新的 IP。也就是它的 IP 是不固定的,不过既然是拨号上网嘛,速度也是有保障的,用它搭建一个代理,那既能保证可用,又能自由控制拨号切换。 如果你是用的 ADSL 上网方式,那就不用过多设置了,直接自己电脑调用一个拨号命令就好了,自动换 IP,分分钟解决封 IP 的事。 然而,你可能说?我家宽带啊,我连得公司无线啊,我蹭的网上的啊!那咋办? 这时,你就需要一台 VPS 拨号主机。
import os import time import threading import multiprocessing from mongodb_queue import MogoQueue from Download import request from bs4 import BeautifulSoup
threads = [] while threads or crawl_queue: """ 这儿crawl_queue用上了,就是我们__bool__函数的作用,为真则代表我们MongoDB队列里面还有数据 threads 或者 crawl_queue为真都代表我们还没下载完成,程序就会继续执行 """ for thread in threads: ifnot thread.is_alive(): ##is_alive是判断是否为空,不是空则在队列中删掉 threads.remove(thread) while len(threads) < max_threads or crawl_queue.peek(): ##线程池中的线程少于max_threads 或者 crawl_qeue时 thread = threading.Thread(target=pageurl_crawler) ##创建线程 thread.setDaemon(True) ##设置守护线程 thread.start() ##启动线程 threads.append(thread) ##添加进线程队列 time.sleep(SLEEP_TIME)
defprocess_crawler(): process = [] num_cpus = multiprocessing.cpu_count() print('将会启动进程数为:', num_cpus) for i in range(num_cpus): p = multiprocessing.Process(target=mzitu_crawler) ##创建进程 p.start() ##启动进程 process.append(p) ##添加进进程队列 for p in process: p.join() ##等待进程队列里面的进程结束
if __name__ == '__main__': for i in range(5): p = multiprocessing.Process(target=process, args=(i,)) p.start()
最简单的创建 Process 的过程如上所示,target 传入函数名,args 是函数的参数,是元组的形式,如果只有一个参数,那就是长度为 1 的元组。 然后调用 start()方法即可启动多个进程了。 另外你还可以通过 cpu_count() 方法还有 active_children() 方法获取当前机器的 CPU 核心数量以及得到目前所有的运行的进程。 通过一个实例来感受一下:
1 2 3 4 5 6 7 8 9 10 11 12 13 14 15 16 17
import multiprocessing import time
def process(num): time.sleep(num) print'Process:', num
if __name__ == '__main__': for i in range(5): p = multiprocessing.Process(target=process, args=(i,)) p.start()
print('CPU number:' + str(multiprocessing.cpu_count())) for p in multiprocessing.active_children(): print('Child process name: ' + p.name + ' id: ' + str(p.pid))
print('Process Ended')
运行结果:
1 2 3 4 5 6 7 8 9 10 11
Process:0 CPUnumber:8 Child process name: Process-2 id:9641 Child process name: Process-4 id:9643 Child process name: Process-5 id:9644 Child process name: Process-3 id:9642 ProcessEnded Process:1 Process:2 Process:3 Process:4
自定义类
另外你还可以继承 Process 类,自定义进程类,实现 run 方法即可。 用一个实例来感受一下:
1 2 3 4 5 6 7 8 9 10 11 12 13 14 15 16 17 18 19
from multiprocessing import Process import time
classMyProcess(Process): def __init__(self, loop): Process.__init__(self) self.loop = loop def run(self): for count in range(self.loop): time.sleep(1) print('Pid: ' + str(self.pid) + ' LoopCount: ' + str(count)) if __name__ == '__main__': for i in range(2, 5): p = MyProcess(i) p.start()
在上面的例子中,我们继承了 Process 这个类,然后实现了 run 方法。打印出来了进程号和参数。 运行结果:
class Producer(Process): def run(self): global buffer, empty, full, lock whileTrue: empty.acquire() lock.acquire() num = random() print 'Producer put ', num buffer.put(num) time.sleep(1) lock.release() full.release()
if __name__ == '__main__': p = Producer() c = Consumer() p.daemon = c.daemon = True p.start() c.start() p.join() c.join() print 'Ended!'
运行结果:
1 2 3 4 5 6 7 8
Producer put 0.719213647437 Producer put 0.44287326683 Consumer get0.719213647437 Consumer get0.44287326683 Producer put 0.722859424381 Producer put 0.525321338921 Consumer get0.722859424381 Consumer get0.525321338921
可以看到生产者放入队列中数据,然后消费者将数据取出来。 get 方法有两个参数,blocked 和 timeout,意思为阻塞和超时时间。默认 blocked 是 true,即阻塞式。 当一个队列为空的时候如果再用 get 取则会阻塞,所以这时候就需要吧 blocked 设置为 false,即非阻塞式,实际上它就会调用 get_nowait()方法,此时还需要设置一个超时时间,在这么长的时间内还没有取到队列元素,那就抛出 Queue.Empty 异常。 当一个队列为满的时候如果再用 put 放则会阻塞,所以这时候就需要吧 blocked 设置为 false,即非阻塞式,实际上它就会调用 put_nowait()方法,此时还需要设置一个超时时间,在这么长的时间内还没有放进去元素,那就抛出 Queue.Full 异常。 另外队列中常用的方法 Queue.qsize() 返回队列的大小 ,不过在 Mac OS 上没法运行。 原因:
def qsize(self): # Raises NotImplementedError on Mac OSX because of broken sem_getvalue() return self._maxsize - self._sem._semlock._get_value()
Producer Received: Consumer Words Consumer Received: Producer Words Ended!
以上是对 pipe 的简单介绍。
Pool
在利用 Python 进行系统管理的时候,特别是同时操作多个文件目录,或者远程控制多台主机,并行操作可以节约大量的时间。当被操作对象数目不大时,可以直接利用 multiprocessing 中的 Process 动态成生多个进程,十几个还好,但如果是上百个,上千个目标,手动的去限制进程数量却又太过繁琐,此时可以发挥进程池的功效。 Pool 可以提供指定数量的进程,供用户调用,当有新的请求提交到 pool 中时,如果池还没有满,那么就会创建一个新的进程用来执行该请求;但如果池中的进程数已经达到规定最大值,那么该请求就会等待,直到池中有进程结束,才会创建新的进程来它。 在这里需要了解阻塞和非阻塞的概念。 阻塞和非阻塞关注的是程序在等待调用结果(消息,返回值)时的状态。 阻塞即要等到回调结果出来,在有结果之前,当前进程会被挂起。 Pool 的用法有阻塞和非阻塞两种方式。非阻塞即为添加进程后,不一定非要等到改进程执行完就添加其他进程运行,阻塞则相反。 现用一个实例感受一下非阻塞的用法:
1 2 3 4 5 6 7 8 9 10 11 12 13 14 15 16 17 18 19
from multiprocessing import Lock, Pool import time
def function(index): print'Start process: ', index time.sleep(3) print'End process', index
if __name__ == '__main__': pool = Pool(processes=3) for i in xrange(4): pool.apply_async(function, (i,))
from multiprocessing import Lock, Pool import time
def function(index): print'Start process: ', index time.sleep(3) print'End process', index return index
if __name__ == '__main__': pool = Pool(processes=3) for i in xrange(4): result = pool.apply_async(function, (i,)) print result.get() print"Started processes" pool.close() pool.join() print"Subprocess done."
Thread-1: Thu Nov 316:43:012016 Thread-2: Thu Nov 316:43:032016 Thread-1: Thu Nov 316:43:032016 Thread-1: Thu Nov 316:43:052016 Thread-2: Thu Nov 316:43:072016 Thread-1: Thu Nov 316:43:072016 Thread-1: Thu Nov 316:43:092016 Thread-2: Thu Nov 316:43:112016 Thread-2: Thu Nov 316:43:152016 Thread-2: Thu Nov 316:43:192016
Starting Thread-1Starting Thread-2 Exiting Main Thread Thread-1: Thu Nov 318:42:192016 Thread-2: Thu Nov 318:42:202016 Thread-1: Thu Nov 318:42:202016 Thread-1: Thu Nov 318:42:212016 Thread-2: Thu Nov 318:42:222016 Thread-1: Thu Nov 318:42:222016 Thread-1: Thu Nov 318:42:232016 Exiting Thread-1 Thread-2: Thu Nov 318:42:242016 Thread-2: Thu Nov 318:42:262016 Thread-2: Thu Nov 318:42:282016 Exiting Thread-2
Starting Thread-1 Starting Thread-2 Thread-1: Thu Nov 318:56:492016 Thread-1: Thu Nov 318:56:502016 Thread-1: Thu Nov 318:56:512016 Thread-2: Thu Nov 318:56:532016 Thread-2: Thu Nov 318:56:552016 Thread-2: Thu Nov 318:56:572016 Exiting Main Thread
# 创建新线程 for tName in threadList: thread = myThread(threadID, tName, workQueue) thread.start() threads.append(thread) threadID += 1
# 填充队列 queueLock.acquire() for word in nameList: workQueue.put(word) queueLock.release()
# 等待队列清空 whilenot workQueue.empty(): pass
# 通知线程是时候退出 exitFlag = 1
# 等待所有线程完成 for t in threads: t.join() print"Exiting Main Thread"
运行结果:
1 2 3 4 5 6 7 8 9 10 11 12
Starting Thread-1 Starting Thread-2 Starting Thread-3 Thread-3 processing One Thread-1 processing Two Thread-2 processing Three Thread-3 processing Four Thread-2 processing Five Exiting Thread-2 Exiting Thread-3 Exiting Thread-1 Exiting Main Thread
各位可以自己实例化测试一下,headers 会不会变哦 ε=ε=ε=(~ ̄ ▽  ̄)~ 好啦下面我们继续还有一个点没有处理:那就是限制 IP 频率的反爬虫。 首先是需要获取代理 IP 的网站,我找到了这个站点 http://haoip.cc/tiqu.htm(这儿本来我是准备教大家自己维护一个 IP 代理池的,不过有点麻烦啊!还好发现这个代理站,还是这么好心的站长。我就可以光明正大的偷懒啦!ヾ(≧O≦)〃嗷~) 我们先把这写 IP 爬取下来吧!本来想让大家自己写,不过有用到正则表达式的,虽然简单,不过有些小哥儿(妹儿)怕是不会使。我也写出来啦.
1 2 3 4 5 6 7 8
iplist = [] ##初始化一个list用来存放我们获取到的IP html = requests.get("http://haoip.cc/tiqu.htm")##不解释咯 iplistn = re.findall(r'r/>(.*?)<b', html.text, re.S) ##表示从html.text中获取所有r/><b中的内容,re.S的意思是包括匹配包括换行符,findall返回的是个list哦! for ip in iplistn: i = re.sub('\n', '', ip)##re.sub 是re模块替换的方法,这儿表示将\n替换为空 iplist.append(i.strip()) ##添加到我们上面初始化的list里面, i.strip()的意思是去掉字符串的空格哦!!(这都不知道的小哥儿基础不牢啊) print(i.strip()) print(iplist)
我们来打印一下看看 下面[———————]中的内容就我们添加进 iplist 这个初始化的 list 中的内容哦! 完美!!好啦现在我们把这段代码加到之前写的代码里面去;并判断是否使用了代理:
If you’re familiar with modifying variables in Sass—or any other CSS preprocessor—you’ll be right at home to move into flexbox mode.
Open the _variables.scss file and find the $enable-flex variable.
Change it from false to true.
Recompile, and done!
Alternatively, if you don’t need the source Sass files, you may swap the default Bootstrap compiled CSS with the compiled flexbox variation. Head to the download page for more information.
</div> <divclass="container"> <divclass="row"> <divclass="col-xs"> 1of3 </div> <divclass="col-xs-6"> 2of3 (wider) </div> <divclass="col-xs"> 3of3 </div> </div> <divclass="row"> <divclass="col-xs"> 1of3 </div> <divclass="col-xs-5"> 2of3 (wider) </div> <divclass="col-xs"> 3of3 </div> </div> </div> <divclass="container"> <divclass="row"> <divclass="col-xs"> 1of3 </div> <divclass="col-xs-6"> 2of3 (wider) </div> <divclass="col-xs"> 3of3 </div> </div> <divclass="row"> <divclass="col-xs"> 1of3 </div> <divclass="col-xs-5"> 2of3 (wider) </div> <divclass="col-xs"> 3of3 </div> </div> </div> <divclass="container"> <divclass="row flex-items-xs-top"> <divclass="col-xs"> One of three columns </div> <divclass="col-xs"> One of three columns </div> <divclass="col-xs"> One of three columns </div> </div> <divclass="row flex-items-xs-middle"> <divclass="col-xs"> One of three columns </div> <divclass="col-xs"> One of three columns </div> <divclass="col-xs"> One of three columns </div> </div> <divclass="row flex-items-xs-bottom"> <divclass="col-xs"> One of three columns </div> <divclass="col-xs"> One of three columns </div> <divclass="col-xs"> One of three columns </div> </div> </div> <divclass="container"> <divclass="row flex-items-xs-left"> <divclass="col-xs-4"> One of two columns </div> <divclass="col-xs-4"> One of two columns </div> </div> <divclass="row flex-items-xs-center"> <divclass="col-xs-4"> One of two columns </div> <divclass="col-xs-4"> One of two columns </div> </div> <divclass="row flex-items-xs-right"> <divclass="col-xs-4"> One of two columns </div> <divclass="col-xs-4"> One of two columns </div> </div> <divclass="row flex-items-xs-around"> <divclass="col-xs-4"> One of two columns </div> <divclass="col-xs-4"> One of two columns </div> </div> <divclass="row flex-items-xs-between"> <divclass="col-xs-4"> One of two columns </div> <divclass="col-xs-4"> One of two columns </div> </div> </div> <divclass="container"> <divclass="row"> <divclass="col-xs flex-xs-unordered"> First, but unordered </div> <divclass="col-xs flex-xs-last"> Second, butlast </div> <divclass="col-xs flex-xs-first"> Third, butfirst </div> </div> </div> <style> .row { margin-top: 1rem; } .row > [class^="col-"] { padding-top: .75rem; padding-bottom: .75rem; background-color: rgba(86, 61, 124, 0.15); border: 1px solid rgba(86, 61, 124, 0.2); } .flex-items-xs-top, .flex-items-xs-middle,.flex-items-xs-bottom { min-height: 6rem; background-color: rgba(255, 0, 0, 0.1); } </style>
{ "name": "bootstrap-sass-demo", "authors": [ "Germey" ], "description": "bootstrap-sass is a Sass-powered version of Bootstrap, ready to drop right into your Sass powered applications.", "moduleType": "globals", "keywords": [ "twbs", "bootstrap", "sass" ], "license": "MIT", "dependencies": { "jquery": ">= 1.9.0" } }
上市了!")


 1、将请求更换为 SplashRequest 请求: 2、每次请求将本次请求的 URL 使用 Meta 参数传递下去; 3、重写 _requests_to_follow 方法:替换响应 Response 的 URL 为我们传递的 URL(否则会格式为 Splash 的地址) 就像下面这样


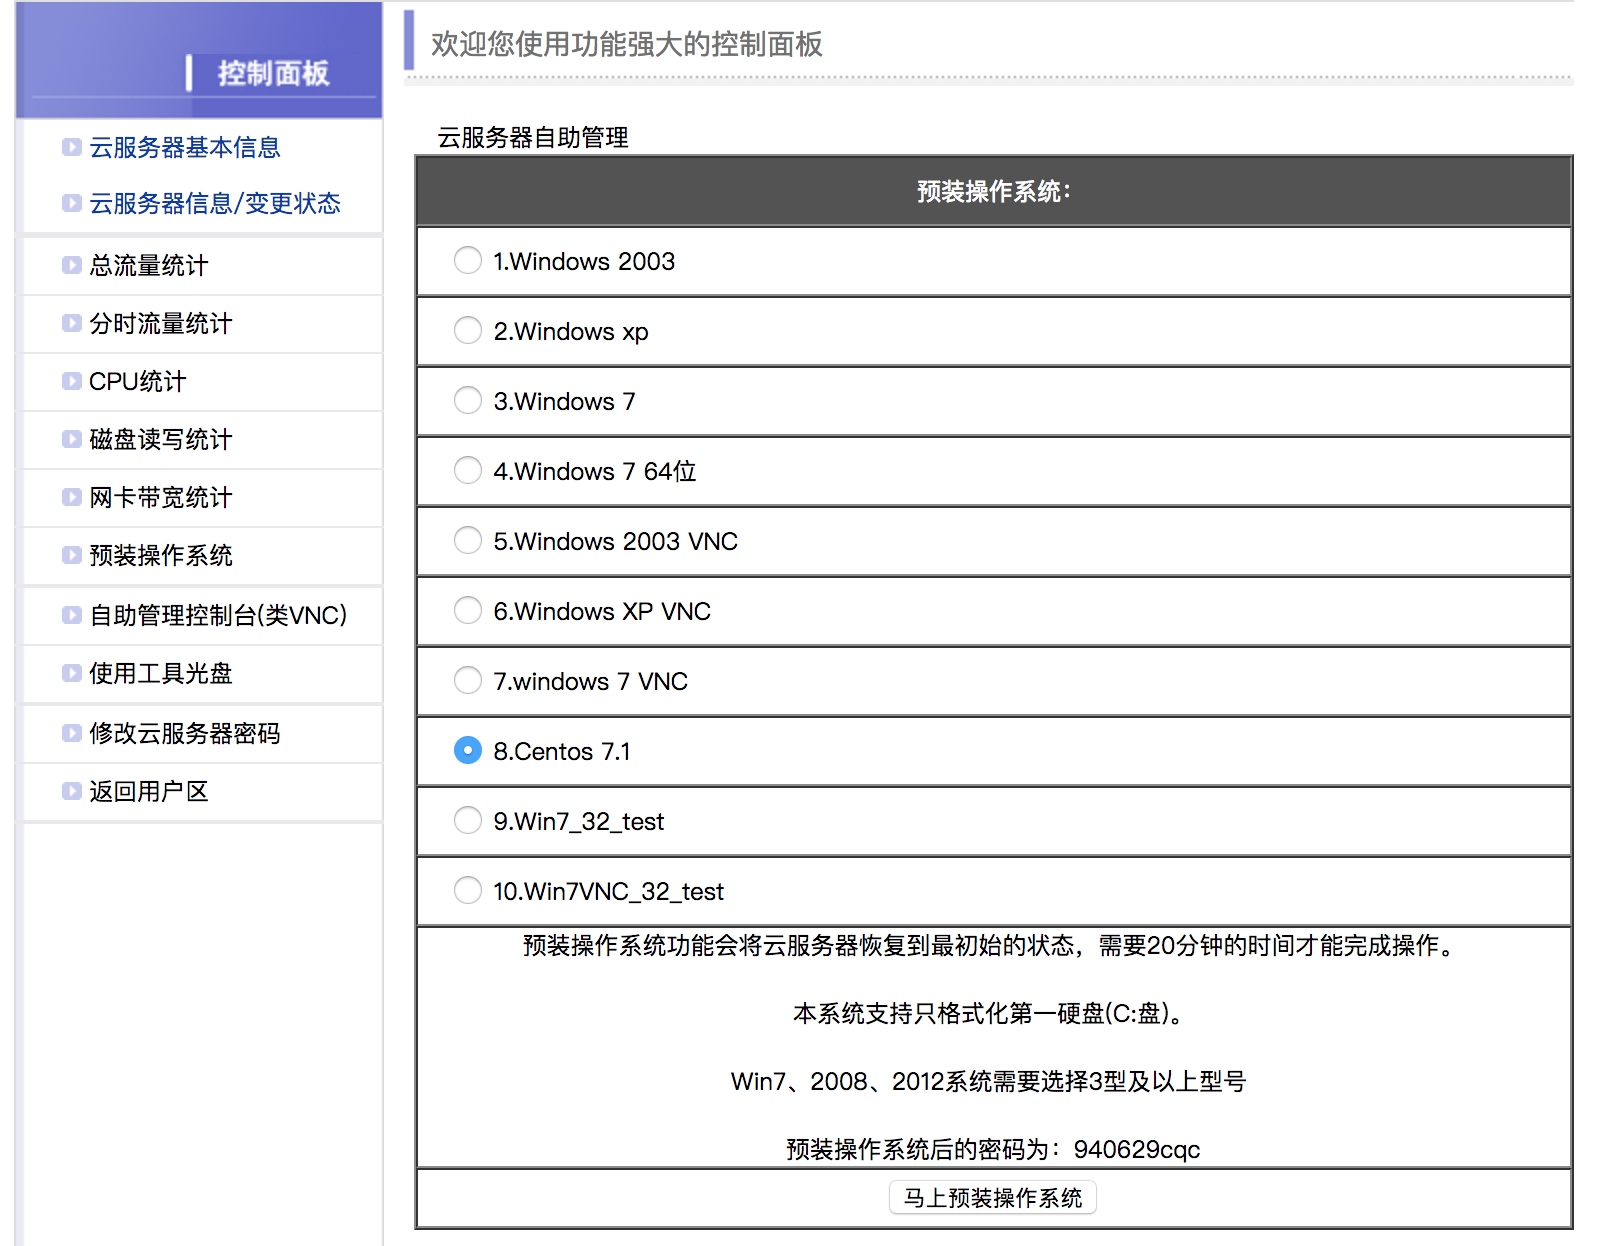 在这里推荐安装CentOS7系统。 然后找到远程管理面板找到远程连接的用户名和密码,也就是SSH远程连接服务器的信息。 比如我这边的IP端口分别是 153.36.65.214:20063,用户名是root。 命令行下输入:
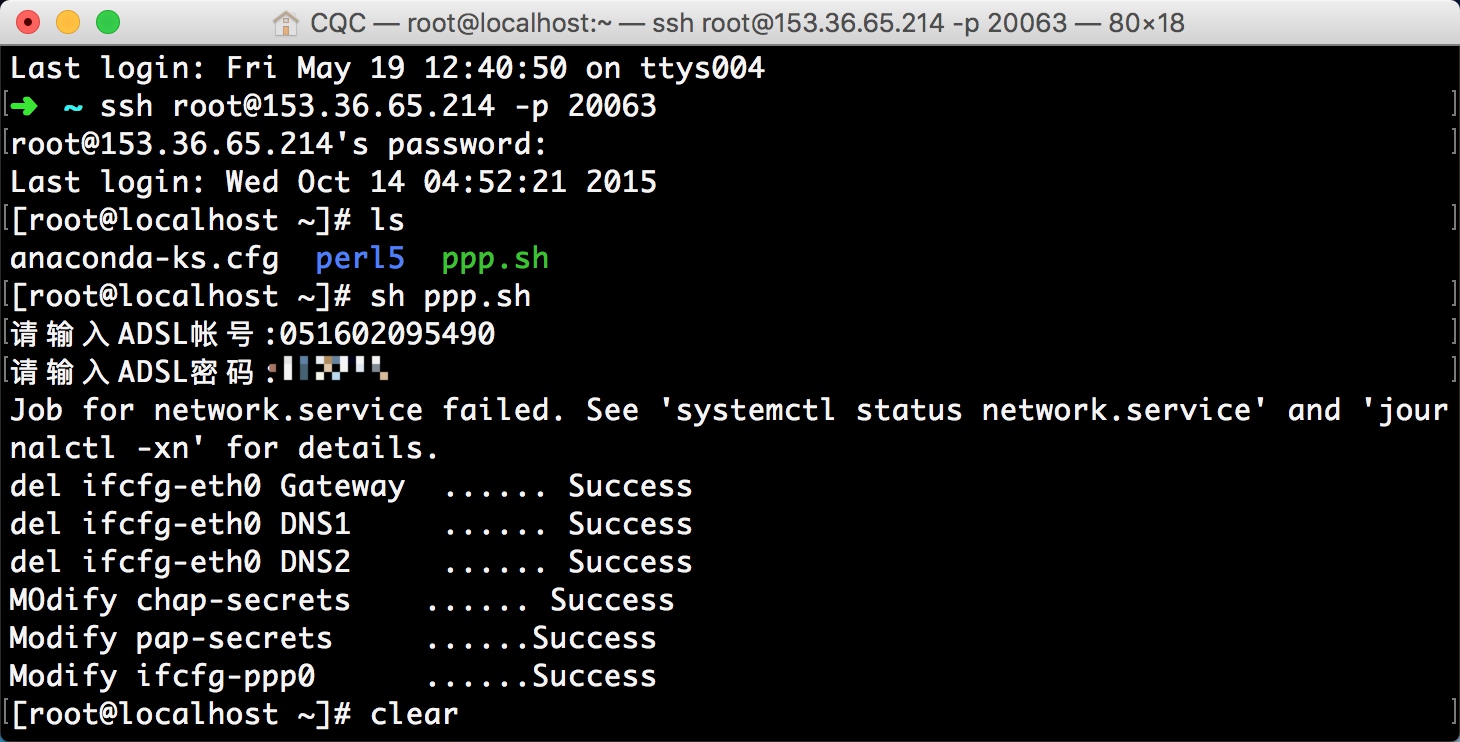 都提示成功之后就可以进行拨号了。 在拨号之前如果我们测试ping任何网站都是不通的,因为当前网络还没联通,输入拨号命令:
 所以断线重播的命令就是二者组合起来,先执行
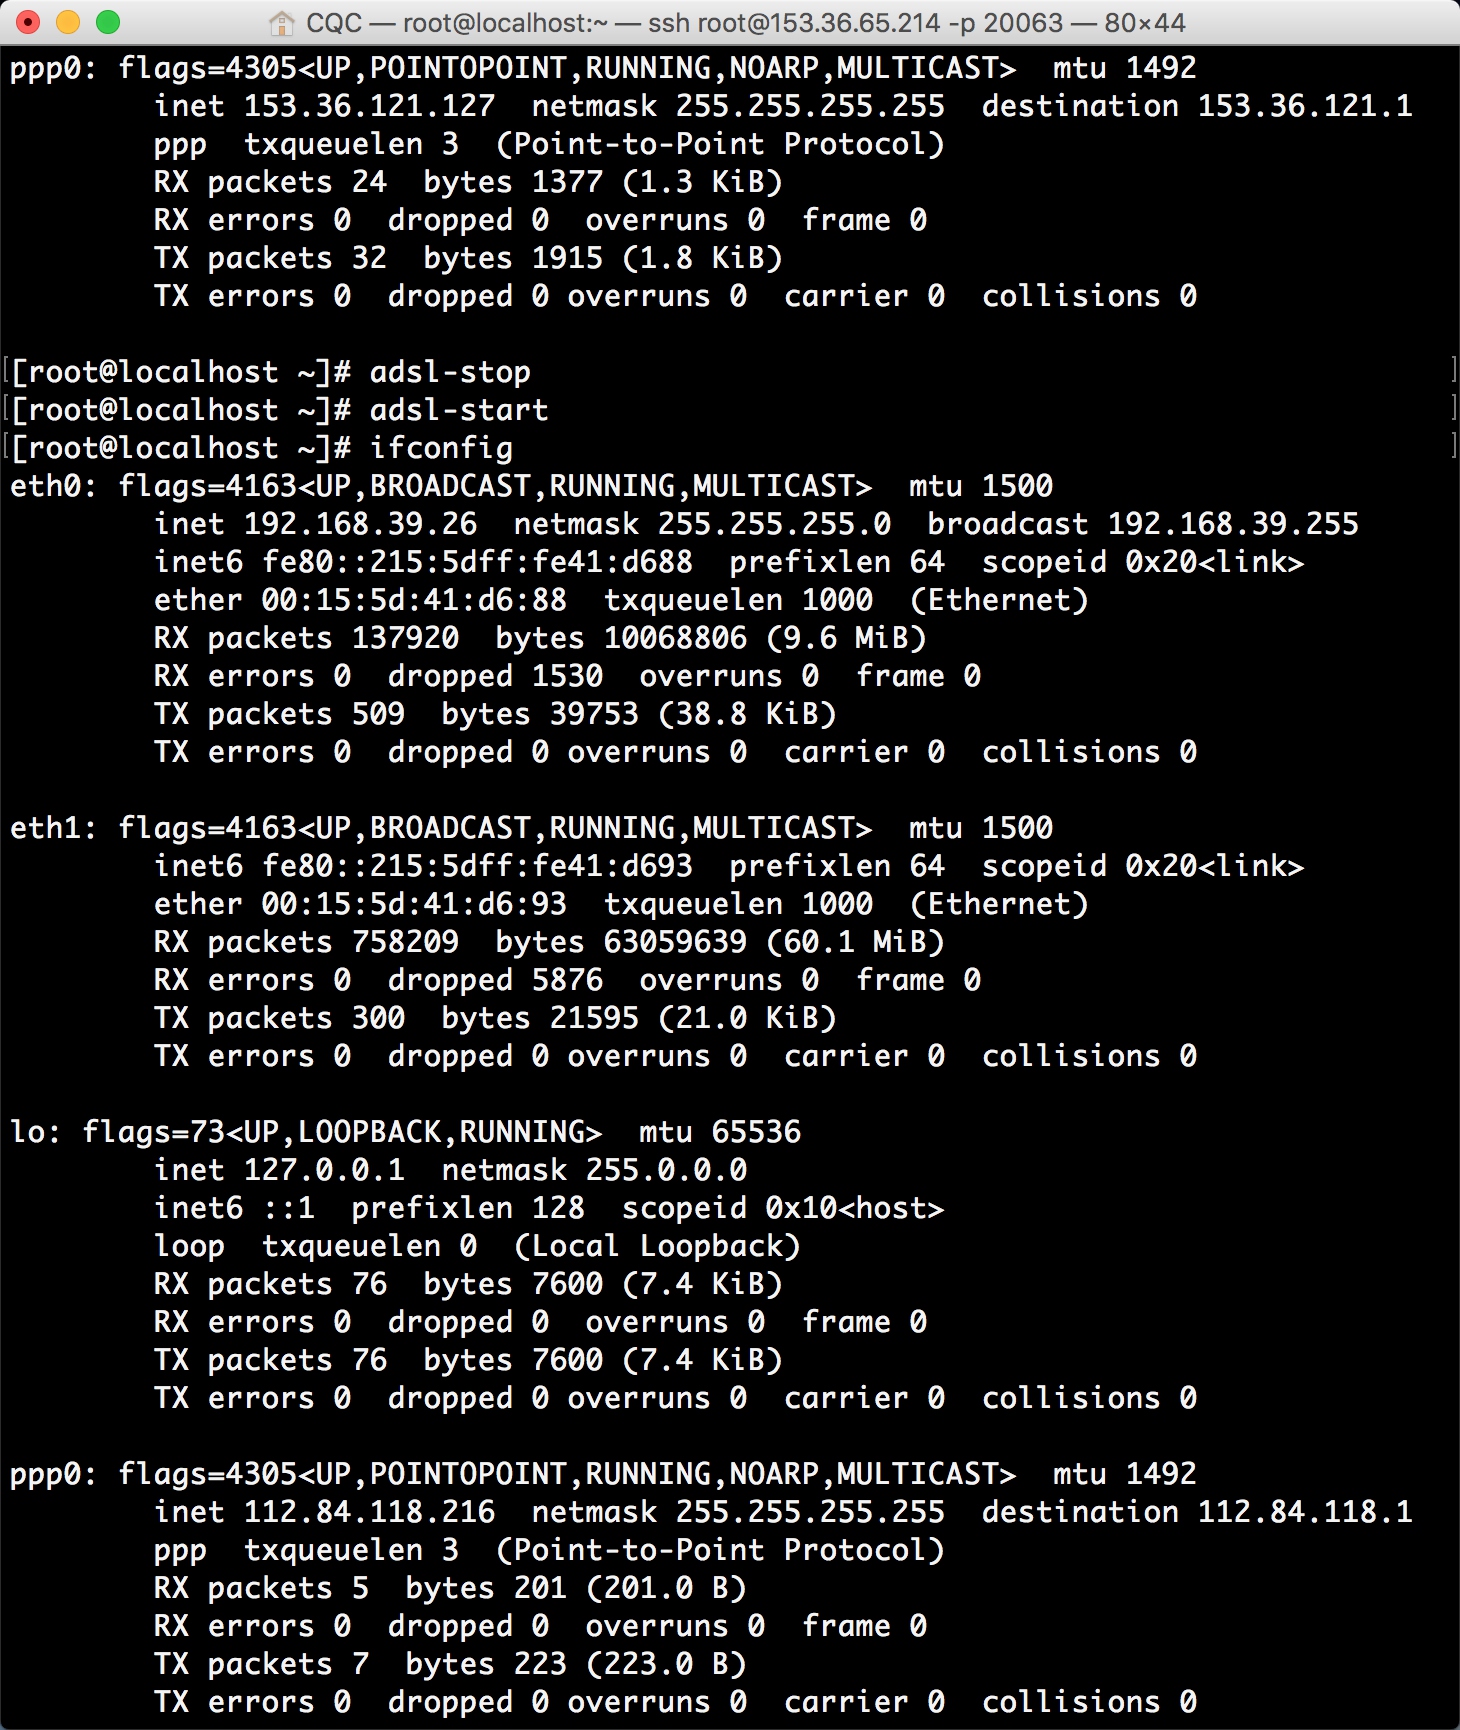 所以,到这里我们就可以知道它作为代理服务器的巨大优势了,如果将这台主机作为代理服务器,如果我们一直拨号换IP,就不怕遇到IP被封的情况了,即使某个IP被封了,重新拨一次号就好了。 所以接下来我们要做的就有两件事,一是怎样将主机设置为代理服务器,二是怎样实时获取拨号主机的IP。
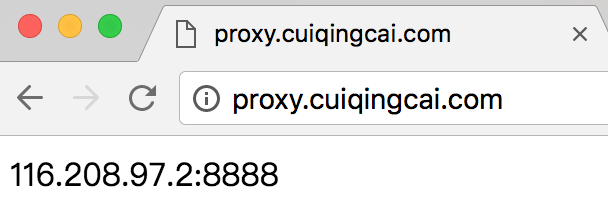
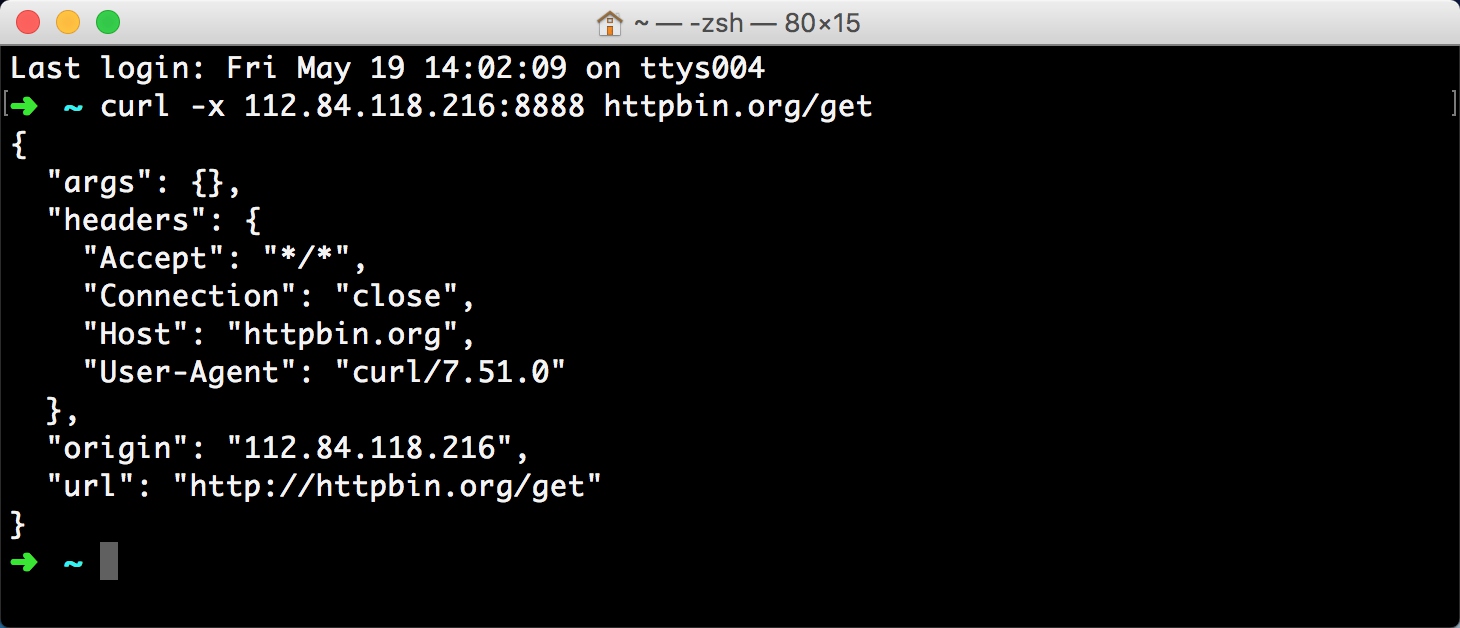 如果有正常的结果输出并且origin的值为代理IP的地址,就证明TinyProxy配置成功了。 好,那到现在,我们接下来要做的就是需要动态实时获取主机的IP了。
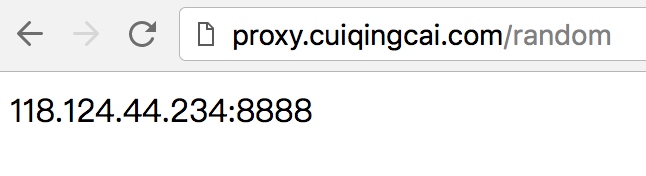 获取最新代理:
  获取所有代理:
 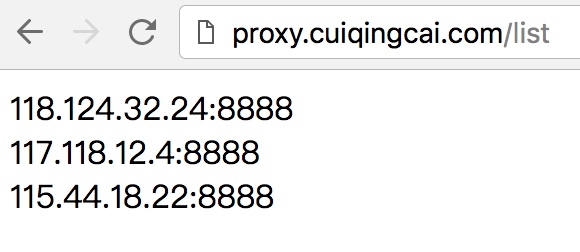 请求接口获取可用代理即可,比如获取一个随机代理:


 我们可以看到这里就是他的一些基本信息,我们需要抓取的就是这些,比如名字、签名、职业、关注数、赞同数等等。 接下来我们需要探索一下关注列表接口在哪里,我们点击关注选项卡,然后下拉,点击翻页,我们会在下面的请求中发现出现了 followees开头的Ajax请求。这个就是获取关注列表的接口。
  我们观察一下这个请求结构
  首先它是一个Get类型的请求,请求的URL是
 可以看到有data和paging两个字段,data就是数据,包含20个内容,这些就是用户的基本信息,也就是关注列表的用户信息。 paging里面又有几个字段,is_end表示当前翻页是否结束,next是下一页的链接,所以在判读分页的时候,我们可以先利用is_end判断翻页是否结束,然后再获取next链接,请求下一页。 这样我们的关注列表就可以通过接口获取到了。 接下来我们再看下用户详情接口在哪里,我们将鼠标放到关注列表任意一个头像上面,观察下网络请求,可以发现又会出现一个Ajax请求。
  可以看到这次的请求链接为
 所以综上所述:
 可以看到返回的结果非常全,在这里我们直接声明一个Item全保存下就好了。 在items里新声明一个UserItem
 看下MongoDB,里面我们爬取的用户详情结果。
  到现在为止,整个爬虫就基本完结了,我们主要通过递归的方式实现了这个逻辑。存储结果也通过适当的方法实现了去重。


 P.S 博主就是后面那个二笔伸手抢镜的(捂脸哭)


 另外还可以指定验证码的另外两种样式。


